
The brochure has to be at the printer by Friday. You upload the PDF to the printer's portal, and an hour later the automatic check sends it back: the hairlines on the floor plan are too thin to print, and a brand colour set up as a spot colour would add a fifth plate. Worse is a file that goes through, with the white logo on the back cover missing from every printed copy because it was set to overprint.
A preflight checklist catches both before the file leaves the studio.
What is a preflight checklist?
A preflight checklist is a fixed list of checks that every print file goes through before it is sent to the printer. It covers setup, export and approval, so the same points get checked on every job, whoever does the export.
The name comes from preflight, the automated test of a PDF against a printer's rules in your PDF or layout software. That test reliably finds missing fonts or the wrong colour space, but it can't tell whether the trim size matches the order or the price on page 3 is out of date. The checklist covers what a person has to decide. For the software, the Ghent Workgroup publishes print specifications that preflight profiles can follow, such as GWG 2022, released on 30 March 2022.
Preflight is one task within prepress, the work between the approved layout and the press. Our prepress guide explains each step.
Where the values in your checklist come from
The values come from your printer's specifications, not from the checklist. Every printer publishes a spec sheet or file supply guide, and its figures can change from one paper or product to the next.
The UK trade printer Tradeprint, for example, asks in its guide to designing for print for 3 mm bleed, at least 3 mm and preferably 5 mm between important content and the trimmed edge, 300 dpi images for small-format print and a total ink coverage of no more than 300%. Lines have to be at least 0.25 pt and type at least 5 pt. It recommends PDF/X-1a:2001 and also accepts PDF/X-3 and PDF/X-4.
In the US, the printing services of Utah Valley University recommend in their guide to setting up print files a bleed of 0.125 inch on all sides, important content 0.125 to 0.25 inch inside the trim and images at 300 ppi at final print size.
For offset printing to ISO 12647-2:2013, the European Color Initiative lists PSO Coated v3 for premium coated paper and PSO Uncoated v3 for uncoated paper. If your printer names a different profile, such as GRACoL, use that one.
The preflight checklist in 8 check groups
Work through the eight groups in this order, from the document setup to the sign-off. Each point is a yes-or-no question, and any “no” gets fixed before the file goes out.
1. File format and PDF/X
- The PDF standard is the one your printer's spec sheet names.
- The export uses that standard and the output profile your printer asks for.
- The PDF has no password and no security settings.
PDF/X is a family of ISO standards for handing over print data. According to the Library of Congress format description (updated 2024), PDF/X-1a is meant for CMYK data, while PDF/X-4, specified in ISO 15930-7:2010, permits transparency, layers and colour-managed workflows.
2. Page size, bleed and safe area
- The document is set up at the trim size of the order, not at trim size plus bleed.
- Backgrounds and images that touch the edge run into the bleed.
- Bleed is switched on in the export settings.
- Text, logos, page numbers and QR codes keep the safe distance from the trim.
- Folded products and booklets follow the printer's template.
3. Images and resolution
- Every image reaches the minimum resolution at the size it is placed, not only in the original file.
- No screen grabs, web images or low-resolution previews are left in the layout.
- Each image is the final, retouched and approved version.
Try it yourself: In the demo you work in a real draftgo workspace with sample data.
4. Colour mode and profiles
- No RGB is left, unless your printer accepts RGB in a PDF/X-4 file and converts it.
- The output profile matches the paper and the printing condition on the spec sheet.
- Dark images and rich black areas stay under the printer's total ink limit.
- Small black text sits on the black plate only and isn't built from four inks.
Tradeprint's design guide asks for black text as C0 M0 Y0 K100 and recommends 100% black for any text below 12 pt.
5. Fonts and fine lines
- Every font is embedded or converted to outlines.
- The font list of the PDF shows every font as embedded.
- No type is smaller and no line thinner than your printer's minimum.
- Strokes set to “hairline” have a real stroke weight.
6. Overprint and transparency
- Overprint is set only where you want it, such as black text on a coloured area.
- No white object is set to overprint, or it vanishes in print.
- The overprint preview in your software shows the result you expect.
- With PDF/X-1a, you have checked the flattened transparency, especially text close to shadows or glows.
7. Spot colours and special layers
- Brand colours that print as a separate ink are set up as spot colours, named the way the printer expects.
- Spot colours that should print in CMYK are converted, so no extra plate appears by accident.
- Dielines, crease lines and varnish areas sit on their own layer as named spot colours, as the printer's template shows.
- The separations preview shows only the plates you expect.
8. Final proof and sign-off
- The exported PDF passes the preflight in your software or the printer's portal, and every warning has been read and decided.
- A second person has read the final PDF for numbers, prices, dates, names and contact details.
- The client has approved this exact PDF, not only an earlier layout.
- Where colour matters, a contract proof from the printer is approved.
- The sign-off is recorded with name, date and file version, and the approved file is the one you send.
Your client can review the final PDF in the browser and mark corrections on the page, as our guide to online proofing explains. For large files and printers without an upload portal, see our comparison of WeTransfer alternatives.
Who checks what and when
The checks belong to different people at different moments. Content is approved first, the technical checks follow, and the client's final sign-off comes last.
| Step | Who | When |
|---|---|---|
| Approve copy, images and layout | Client and project lead | Before final artwork |
| Set up and check the file, groups 1 to 7 | Designer or artworker | Before export |
| Run preflight on the exported PDF | Designer or artworker | Right after export |
| Read the final PDF for content | A second person in the team | After preflight |
| Approve the final print file | Client | Before the file goes to the printer |
| Approve a contract proof, where colour matters | Client with the printer | Before the print run |
If copy changes after final artwork, the checklist starts again at group 1. Agree early who may give the final “OK to print”, ideally in the creative brief.
Download the preflight checklist
The checklist is free to download as PDF and Word, without an email address. Enter your printer's values at the top, then tick off the eight groups.
Preflight checklist: check your print file before it goes to the printer
Free template to download
Example: a conference programme for a client
A freelance designer creates a 16-page programme for a client's conference. The printer's spec sheet asks for PDF/X-4, 3 mm bleed and its own coated profile. The client approved copy and layout after two rounds of comments, so the designer starts the final artwork and enters the printer's values in the checklist.
Group 3 stops her on the back page: two sponsor logos come from the sponsors' websites as small RGB files, so she asks for vector versions. Group 6 finds a white logo set to overprint that would have vanished on the dark cover, and she switches it to knock out.
The PDF passes the printer's preflight on the first upload. Because the sponsor logos changed after the layout approval, the client approves the final PDF once more, and that version goes to print.
How it works in draftgo
In draftgo you handle the parts of the checklist that need people: the internal read of the final PDF and the client's sign-off on the print file. Clients review through a link, without an account.
1. Upload the print PDF to a loop
Upload the exported PDF to the project. Approvals run in loops, for example an internal check first and the client round after it.
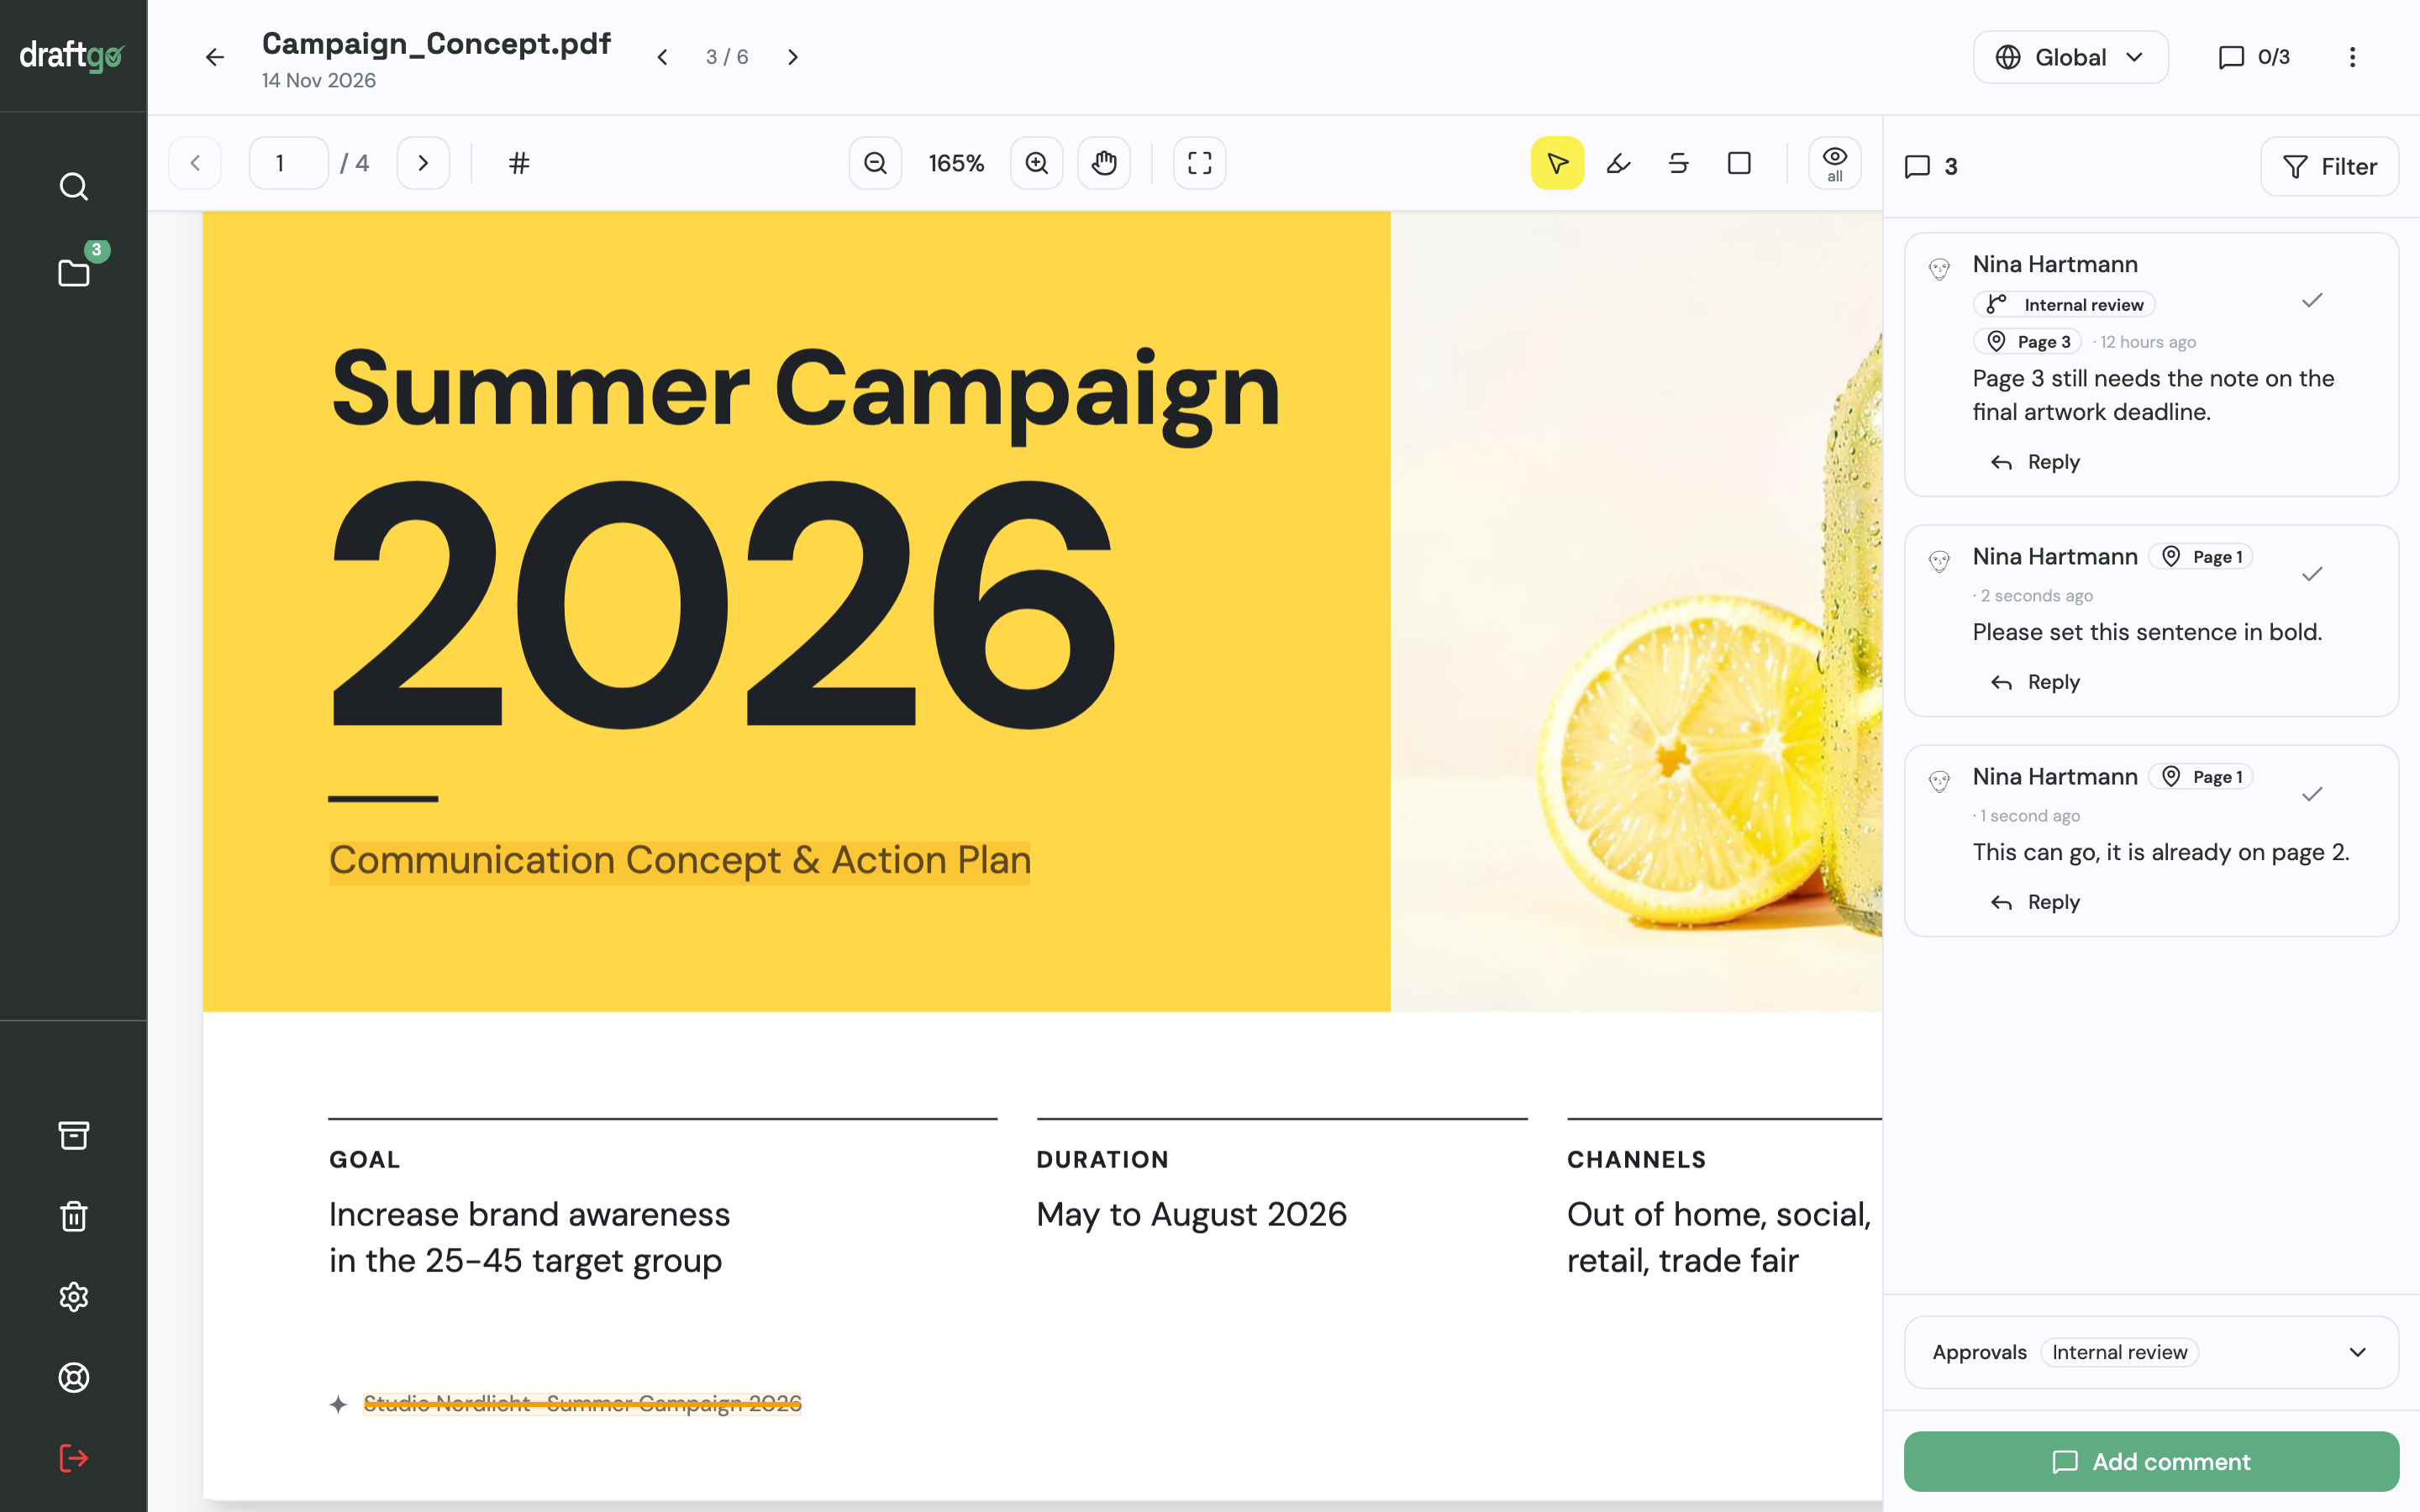
2. Mark corrections on the page
Highlight text, strike it through or place a point or a rectangle on the PDF page. Each comment sits at its spot on the page, so the artworker sees which word is meant.
3. Run the AI review before the client round
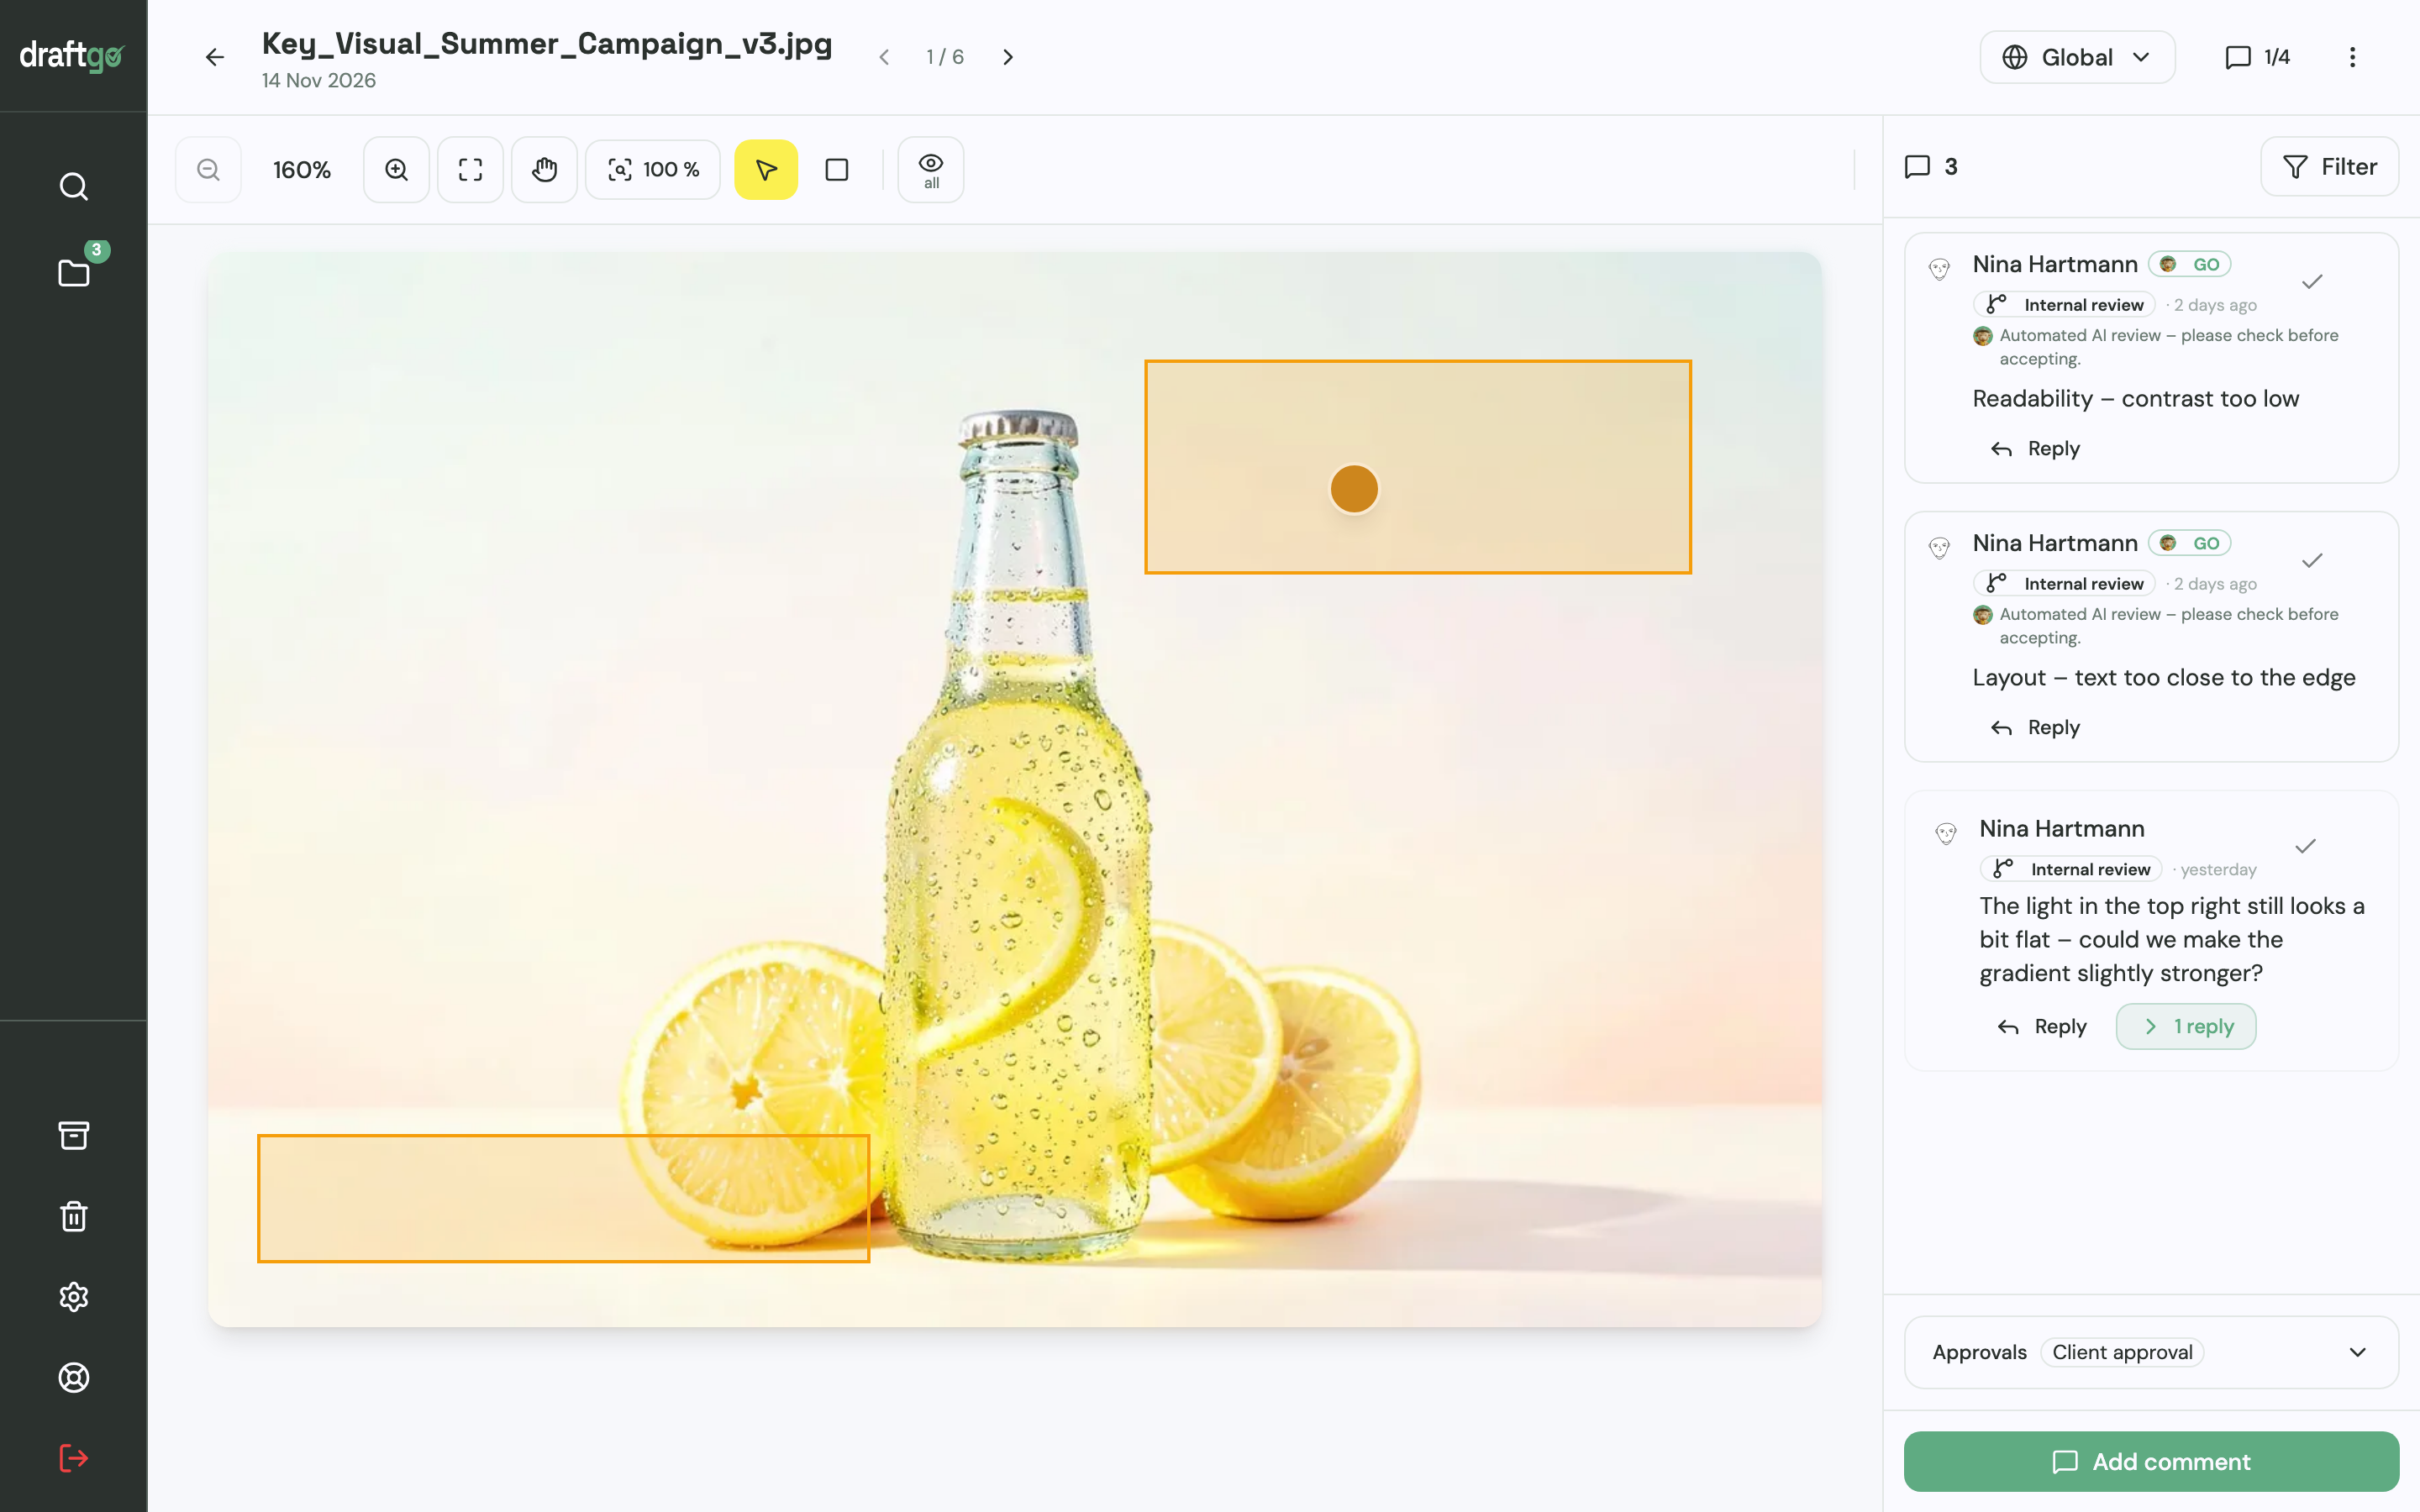
Our AI agent “GO” checks PDFs and images on request for errors such as spelling, cut-off text or very small type, and in print PDFs it also measures image resolution. GO places its findings as comments at the affected spot, and you decide what to change. Your plan sets the monthly page allowance for the AI review, as the pricing page shows.
The technical file check still runs in your PDF software or the printer's upload portal.
4. Upload the corrected file as a new version
The corrected PDF goes in as a new version of the same file. Earlier versions stay available and approvals start again, so an approval always belongs to the current version.
5. Let the client approve the final print file
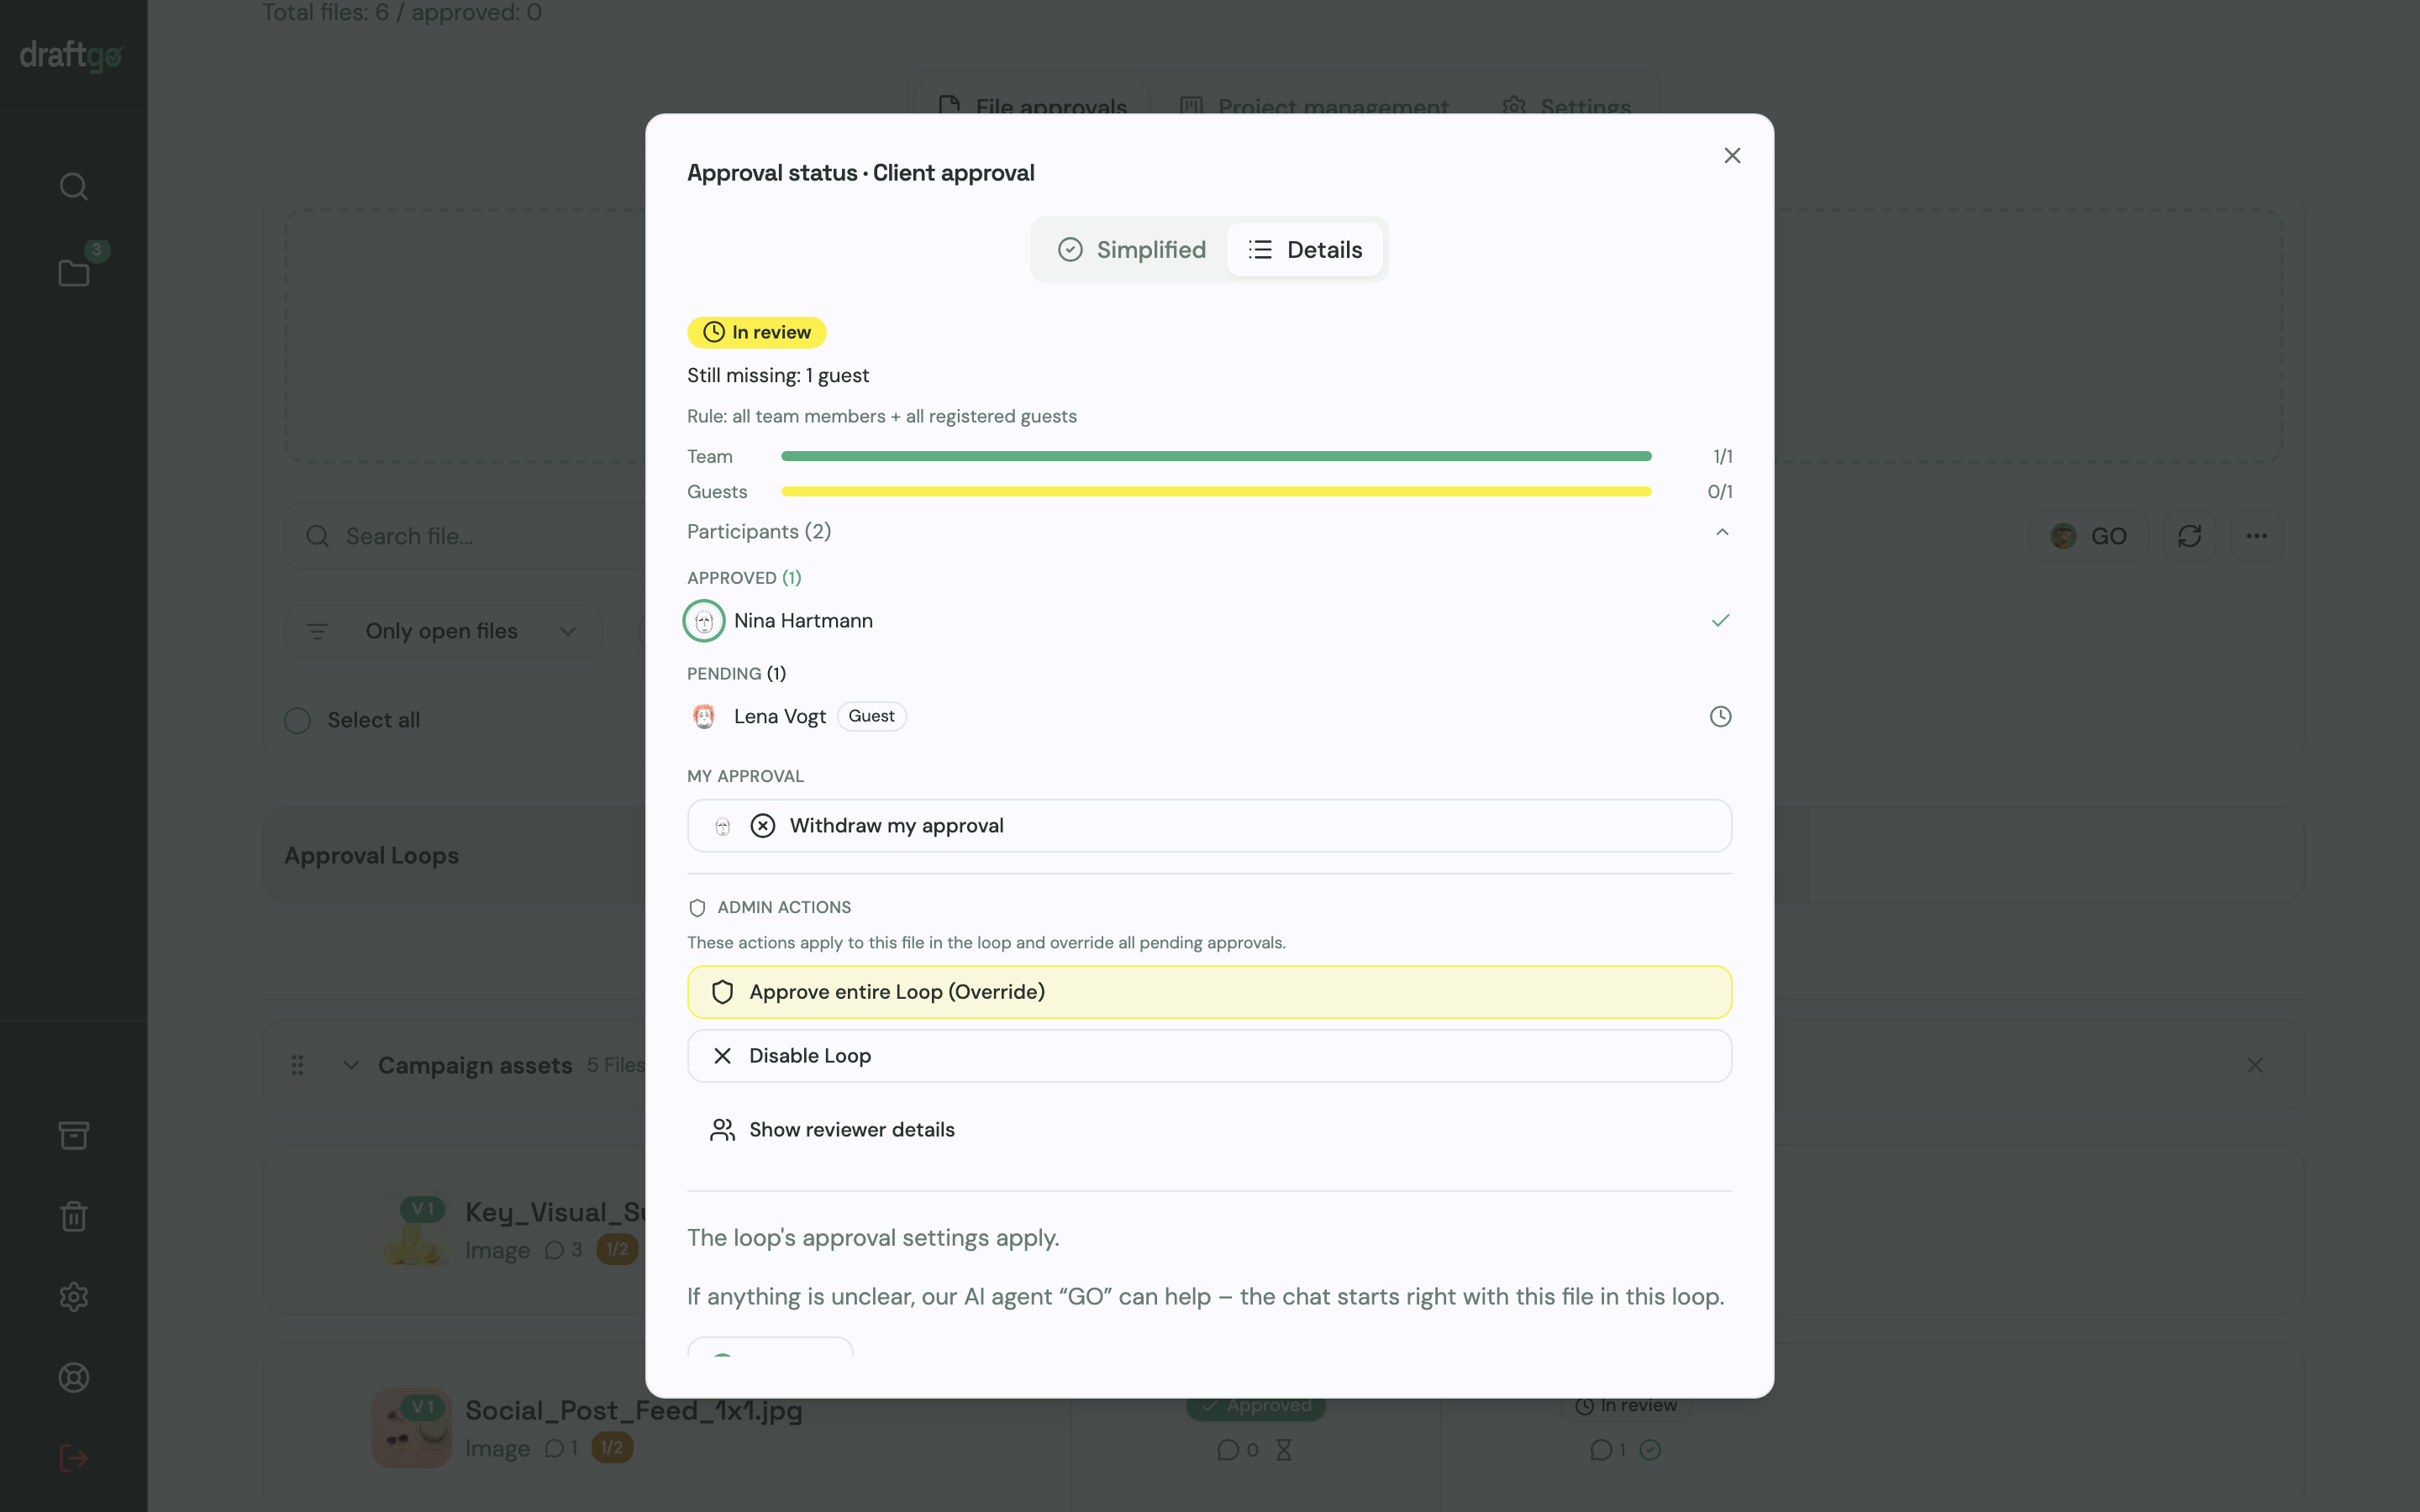
Your client opens a personal approver link and approves the current version, and you see who has approved and who is still pending.
The activity log records approvals, comments, versions and downloads with person and time, and you can export it as CSV, JSON or PDF for the job file. How agencies get flyers, posters and ads through approval is shown on the page for print and advertising approval.
FAQ
What is the difference between a preflight checklist and preflight software?
A preflight checklist is what a person works through while setting up and exporting the file. Preflight software tests the finished PDF automatically against a profile, such as your printer's rules or a PDF/X standard, and can't judge whether the trim size matches the order or which elements should overprint.
Which PDF standard should I export for print?
Export the standard your printer's spec sheet names. With PDF/X-1a, RGB and CMYK colours are converted to CMYK while spot colours stay, and transparency has to be flattened, whereas PDF/X-4 keeps transparency intact and also accepts RGB, as the US printer Printing for Less explains in its guide to PDF presets (updated 2024). If the spec sheet says nothing, ask your printer before you export.
Can my client approve the print file without an account?
In draftgo, yes. Your client opens a personal approver link, comments directly on the PDF page and approves the current version.
Who should sign off a print file?
The client signs off the final PDF that goes to the printer, after the technical checks and the internal read. Where colour is critical, the client also approves a contract proof from the printer. Record the name, the date and the file version, so everyone knows which file was approved.
Conclusion
Enter your printer's values in the checklist before you export, work through the eight groups and let preflight software confirm the finished PDF. Then have the client approve exactly that file and send that version to the printer.
Try it free – draftgo is free for 14 days, no credit card needed.
Preflight checklist: check your print file before it goes to the printer
Free template to download
Written by
Emilia
Content Producer
Ready to streamline your approval processes?
Get started with draftgo today and see how easy professional collaboration can be.