
The brochure is designed, the client has signed off the layout and the PDF goes to the printer. Two days later an email arrives: the photos are still in RGB, one font isn't embedded and there is no bleed. Or no email arrives at all, and the typo in the phone number turns up when the boxes are unpacked in the client's office.
Prepress is everything that happens between the approved layout and the printed copies, and it decides whether a file runs straight through production or comes back for another round. This guide explains what prepress is, which tasks belong to it and how proofing and approval should work between design sign-off and print. At the end you'll find a checklist for print files that you can reuse on every job.
What is prepress?
Prepress is the set of tasks that turns a finished design into print-ready data and, at the end, into a printing plate or a file a digital press can output. It includes checking and preparing the files, converting colours for the printing process, arranging pages on the press sheet, proofing and the output itself. The Wikipedia article on prepress describes it as the processes between the creation of a print layout and the final printing, with proofing, quality checks and plate making among them.
The word also names the people who do this work: the prepress department of a print shop or a specialised prepress service. Where prepress once meant film, hand assembly and manual platemaking, almost every step now runs on files, and the designer usually hands over a PDF.
Where prepress sits in a print job
Prepress comes after design and before printing, and in practice the work is shared. The agency or freelancer delivers a print-ready PDF, and the printer checks it and prepares it for its press.
| Stage | Who | Result |
|---|---|---|
| Concept and design | Agency or freelancer | Layout with copy and images |
| Proofreading and client review | Agency and client | Approved content |
| Final artwork and print files | Agency, freelancer or artworker | Print-ready PDF |
| Printer's prepress | Printer | Checked data, proof, plates |
| Printing | Printer | The print run |
| Finishing | Printer or bindery | Trimmed, folded, bound or finished copies |
The cleaner the files that leave your studio, the shorter their path through the printer's prepress. Many tasks that once belonged to the printer alone, such as preflight or colour conversion, are now done by designers in their layout software.
The prepress steps from file handover to plate
Prepress has six core tasks: preflight, colour management, file preparation, imposition, proofing and output through the RIP. The table shows what happens in each and which errors typically surface there.
| Task | What happens | Errors that typically surface |
|---|---|---|
| Preflight | The PDF is checked against the printer's specification | Missing fonts, wrong trim size, no bleed |
| Colour management and separation | Colours are converted for the printing process and split into inks | RGB images, wrong profile, a spot colour built from CMYK |
| File preparation | Images, fonts, transparency and overprint are checked | Low image resolution, white text set to overprint |
| Imposition | Pages are arranged on the press sheet so they read correctly after folding | A page count that does not fit the binding |
| Proofing | A proof shows the result before production | Colour shifts, content errors that only show now |
| RIP and output | Data is rasterised and sent to plate or press | Elements that render differently than expected |
1. File handover and preflight
Prepress starts with checking the files you deliver. In a preflight, software runs over the PDF and compares it with the printer's specification: trim size, bleed, embedded fonts, colour spaces, image resolution and the PDF standard you agreed on.
The usual exchange format for print files is PDF/X. Its variant PDF/X-4 is defined in ISO 15930-7, first published in 2008 with a corrected edition in 2010, and supports colour-managed CMYK, grey, RGB and spot colour data as well as transparency, according to the Wikipedia article on PDF/X. Which variant your printer expects is in its spec sheet.
In its guideline MediaStandard Print 2018, the German print and media federation bvdm recommends PDF/X-4 for workflows that keep images in RGB for as long as possible and PDF/X-1a for workflows that convert to CMYK early. For the checks themselves, the Ghent Workgroup publishes preflight specifications. Its specification GWG 2022, released on 30 March 2022, sets rules that let preflight tools skip false alarms, for example about an image that is clipped away or completely covered by other content.
Many printers also preflight automatically when you upload and send errors back. Automated preflight is fast and consistent, but it only sees technical problems. It finds a missing font or an RGB image; it cannot tell that a price on page 12 is wrong. That is why a person still reads the final file before it goes to press.
2. Colour management and separation
Colour management converts the colours of your file so they look as intended on the chosen press and paper. It relies on ICC profiles, which describe how a printing condition reproduces colour.
For offset printing, the international standard is ISO 12647-2 in its 2013 edition. The European Color Initiative lists matching ICC profiles on its page about colour standards for offset printing, such as PSO Coated v3 for premium coated paper, based on the FOGRA51 characterisation data, and PSO Uncoated v3 for uncoated paper, based on FOGRA52.
If your printer works to GRACoL, the profile GRACoL2013_CRPC6 from Idealliance describes the printing condition CRPC6 of CGATS.21-2. It also sets the total area coverage, the maximum amount of ink on one spot, at 320%, as the ICC profile registry lists.
Separation splits each colour into the inks that will print it, usually cyan, magenta, yellow and black. In offset printing each ink gets its own plate. A spot colour, such as a brand colour from the client's guidelines, prints as its own ink on its own plate, so it has to be set up as a spot colour in the file and not as a CMYK mix.
3. Images, fonts, bleed and overprint
File preparation covers everything that looks fine on screen but causes trouble on press. The usual problem areas are image resolution, fonts, bleed, transparency and overprint.
- Images: the resolution has to fit the printed size. A photo that looks sharp on screen can print soft or pixelated if it was scaled up in the layout. Your printer's print specifications name the minimum.
- Fonts: every font must be embedded in the PDF. Otherwise the system substitutes another font and the line breaks shift.
- Bleed: anything that runs to the edge has to extend beyond the trim size, so no thin white line is left after cutting. A standard bleed is about one-eighth of an inch or 3 mm, according to the Wikipedia article on bleed, but your printer has the final word.
- Transparency: drop shadows, gradients and transparent objects are either flattened when you export or kept live in a PDF/X-4 file and processed later.
- Overprint and trapping: trapping lets neighbouring colour areas overlap slightly, so small registration shifts on press leave no white gaps. Overprint set by mistake does the opposite and makes elements disappear, such as white text set to overprint.
- Black text: small black text belongs in pure black, on the black plate only. Built from all four inks, it blurs as soon as the plates are slightly out of register.
Try it yourself: In the demo you work in a real draftgo workspace with sample data.
4. Imposition
Imposition arranges the pages on the press sheet so that they end up in the right order after folding, binding and trimming. Which scheme fits depends on sheet size, fold and binding.
For agencies, the most important consequence concerns the page count, which has to suit the binding. A saddle-stitched brochure is made of folded sheets nested inside each other, so not every page count is possible. Ask the printer before you start the layout which page counts work for the binding you've chosen, and you avoid blank pages or last-minute cuts.
The printer often sends an imposition proof before the run. According to the Wikipedia article on imposition, it is the last check before printing starts and shows whether every page sits in the right place and whether bleeds across a spread line up. It is printed at low resolution, so it says nothing reliable about colour or image quality. Colour bars and other control elements also go onto the sheet at this stage, so the printer can monitor ink and register on press.
5. Proofing
A proof shows how the result will look before production starts. It is the last point at which a mistake costs you a new file rather than a new print run. There are several kinds, from a PDF on any screen to a print on the production press, and the next section compares them.
6. RIP, plates and digital output
In the last step, a raster image processor, or RIP, converts the data into the halftone dots the press can print. In offset printing it drives the platesetter, which images the plates directly from the data, a process called computer-to-plate.
Digital printing has no plates: the rasterised data goes directly to the press. That makes digital printing a good fit for short runs and personalised print, while offset is the more economical choice for longer runs.
Types of proofs: soft proof, hard proof and contract proof
A proof is a preview of the printed result, and the kinds differ in what they can confirm. A PDF on any screen is enough to check content, while colour needs a calibrated soft proof or a measured print.
| Proof | What it is | What it can confirm | When you need it |
|---|---|---|---|
| PDF proof | The final print file on any screen | Copy, images, details, layout | Every job |
| Soft proof | A simulation of the print on a calibrated monitor | Expected colour, including paper white | Colour checks on screen in a controlled setup |
| Hard proof | An inkjet print that simulates the printing condition | Colour, once it is measured | When colour matters and a print is needed |
| Contract proof | A measured hard proof agreed as the colour reference | Colour as the reference for the run | Brand colours, packaging, premium print |
| Press proof | A print on the production press and paper | Colour on the real paper, finishes | Special papers and finishes |
| Imposition proof | A low-resolution print of the imposed sheets | Page order and spreads | Multi-page products |
In photography, “proofing” usually means something else: clients pick and rate images in an online gallery, as our guide to photo proofing software explains. In print, a proof is always a preview of the printed piece. Reviewing a PDF proof in the browser, with comments right on the page, is called online proofing.
Soft proof: colour on a calibrated screen
A soft proof simulates the printed result on a monitor. With the right output profile, the screen shows how the file will look on the chosen paper, including the paper white.
For that simulation to be reliable, the monitor has to be calibrated and profiled, the room light has to follow a standard and the output profile has to match the job. The bvdm guideline MediaStandard Print 2018 names ISO 14861:2015 for soft proofing systems and ISO 12646:2015 for displays, and asks for proofs and prints to be compared under D50 light (5,000 kelvin) according to ISO 3664:2009.
A normal office screen or the client's laptop shows colours differently from device to device, so it is not suitable for approving colour. That does not make the screen check useless. For copy, images, details and layout, any screen will do, and that is where many of the expensive print errors start.
Contract proof: the agreed colour reference
A contract proof is a hard proof that client, agency and printer agree on as the colour reference for the print run. Unlike an ordinary hard proof, it is measured. The bvdm's MediaStandard Print 2018 guideline requires a Fogra CMYK media wedge on every contract proof print, with tolerances according to ISO 12647-7:2016. It also asks for a status line and a footer that names the file, the date, the software, the proofing system and the profiles used.
If the measured wedge is within tolerance, the proof shows the printing condition correctly, and once the client approves it, the printer has a reference to match on press.
Proof and client approval before print
Between design sign-off and print lie several approvals, and this is where costly mistakes slip through. The client has approved the layout, but have they seen the final print file with every last correction? And who confirmed the colours?
It helps to separate three approvals:
| Approval | What is checked | Who checks | On what |
|---|---|---|---|
| Content approval | Copy, images, prices, contact details, layout | Client and subject experts | PDF of the final version |
| File approval | Trim size, bleed, colour spaces, fonts, resolution | Agency and prepress | Print-ready PDF, preflight report |
| Colour approval | Colour, brand colours, image mood | Client with agency or printer | Contract proof or press proof |
At the end comes the sign-off often called “OK to print”: the explicit confirmation that exactly this file or this proof may be printed. These five steps get you there.
1. Finish the content before final artwork
All content corrections belong in the layout phase. Every text change after final artwork means a new print file and another check. Mark corrections directly in the PDF so it is clear what changes where, and agree early who reviews and who signs off, ideally while you onboard a new client.
2. Check the print file internally
Before the client sees the final file, a second person in your team checks the print PDF. Are trim size and bleed right, are all corrections in, is this the right export? A preflight in your layout software catches the technical problems, and a colleague's eye catches the content ones.
3. Have the client approve the exact print file
Don't stop at the layout approval and assume the print file matches it. Ask the client to approve the very PDF that goes to the printer, so they see the final state of every page, including changes made during final artwork. Ask them specifically to check numbers, prices, dates and contact details, because errors there hurt most once printed.
4. Order a contract proof where colour matters
Brand colours, demanding images, special papers and packaging justify a contract proof or a press proof. For a simple job on standard paper with a standard profile, clean files and a content approval are often enough. Settle this with the client and the printer before the run, not after it.
5. Record the sign-off and send exactly that file
Write down who approved which file or proof and when, and send exactly that version to the printer. A file name with a clear version number helps everyone see which file is final.
Prepress for packaging
Packaging needs more prepress work than a flyer or a brochure. On top of the layout come the dieline, the substrate and the finishes, and each needs its own preparation.
- Dieline: the cutting and creasing contour sits on its own layer or as a named spot colour and does not print. Copy and key elements keep their distance from folds and cuts.
- Substrate: board, film and corrugated board reproduce colour differently from coated paper. Profile and proof have to match the material.
- Finishes: varnish, embossing and foil are set up as separate layers, usually as spot colours with their own names.
- Barcodes and mandatory details: barcodes must be large enough to scan, and every detail the client specifies for the pack must be complete and current.
- More reviewers: packaging often goes past marketing, product management and quality assurance. Decide early who approves what.
How packaging teams run these review rounds in draftgo is shown on the page for packaging design approval.
Print file checklist
Run through this checklist before a file goes to the printer. The exact values for bleed, resolution and profile come from your printer's specifications.
Format and bleed
- Trim size matches the order.
- Bleed on every edge where elements run off, as the printer specifies.
- Text and logos keep a safe distance from the trim.
- The page count suits the binding.
Colour
- Colour mode and output profile as the printer specifies.
- Spot colours set up as spot colours, named correctly and used only where they should print.
- Small black text in pure black, not built from four inks.
- Overprint checked, especially on white and coloured elements.
Images
- Resolution fits the printed size.
- No placeholders or low-resolution previews left in the layout.
- Every image is the final, approved version.
Fonts and copy
- All fonts embedded.
- Spelling, numbers, prices, dates and contact details checked.
- Links, QR codes and phone numbers tested.
File and approval
- PDF exported to the standard the printer asks for.
- File name with a clear version number.
- The approved file is exactly the file that goes to the printer.
- Sign-off recorded with name, date and version.
Example: a product catalogue from sign-off to press
A two-person studio designs a 24-page product catalogue for a kitchenware brand. After two rounds of corrections, the client's marketing lead approves the layout. The studio prepares the final artwork and uploads the PDF to the printer's portal.
The printer's automated check flags two problems: several product photos are still in RGB, and three pages have no bleed. The studio fixes both and exports again. Because images and page edges have changed, it sends the final file back to the client, this time asking her to check prices and item numbers in particular. She spots two prices swapped on page 18.
The brand's teal will be printed on uncoated paper, so the studio orders a contract proof. On that stock the colour comes out noticeably duller. Together with the printer, the client decides to print the teal as a spot colour and signs off the new proof. The studio records file, version and date and sends the approved version to press.
For the next job, the studio changes two things. The client always approves the final print file, not only the layout, and when a brand colour meets an unusual paper, a contract proof is in the schedule from the start.
How it works in draftgo
In draftgo you review print PDFs with your team and your clients, with corrections marked right on the page and a documented approval at the end. Clients review through a link and don't need an account.
1. Upload the print PDF
Upload the print file or the current layout as a PDF to the project. Word files are converted to PDF on upload.
2. Mark corrections on the page
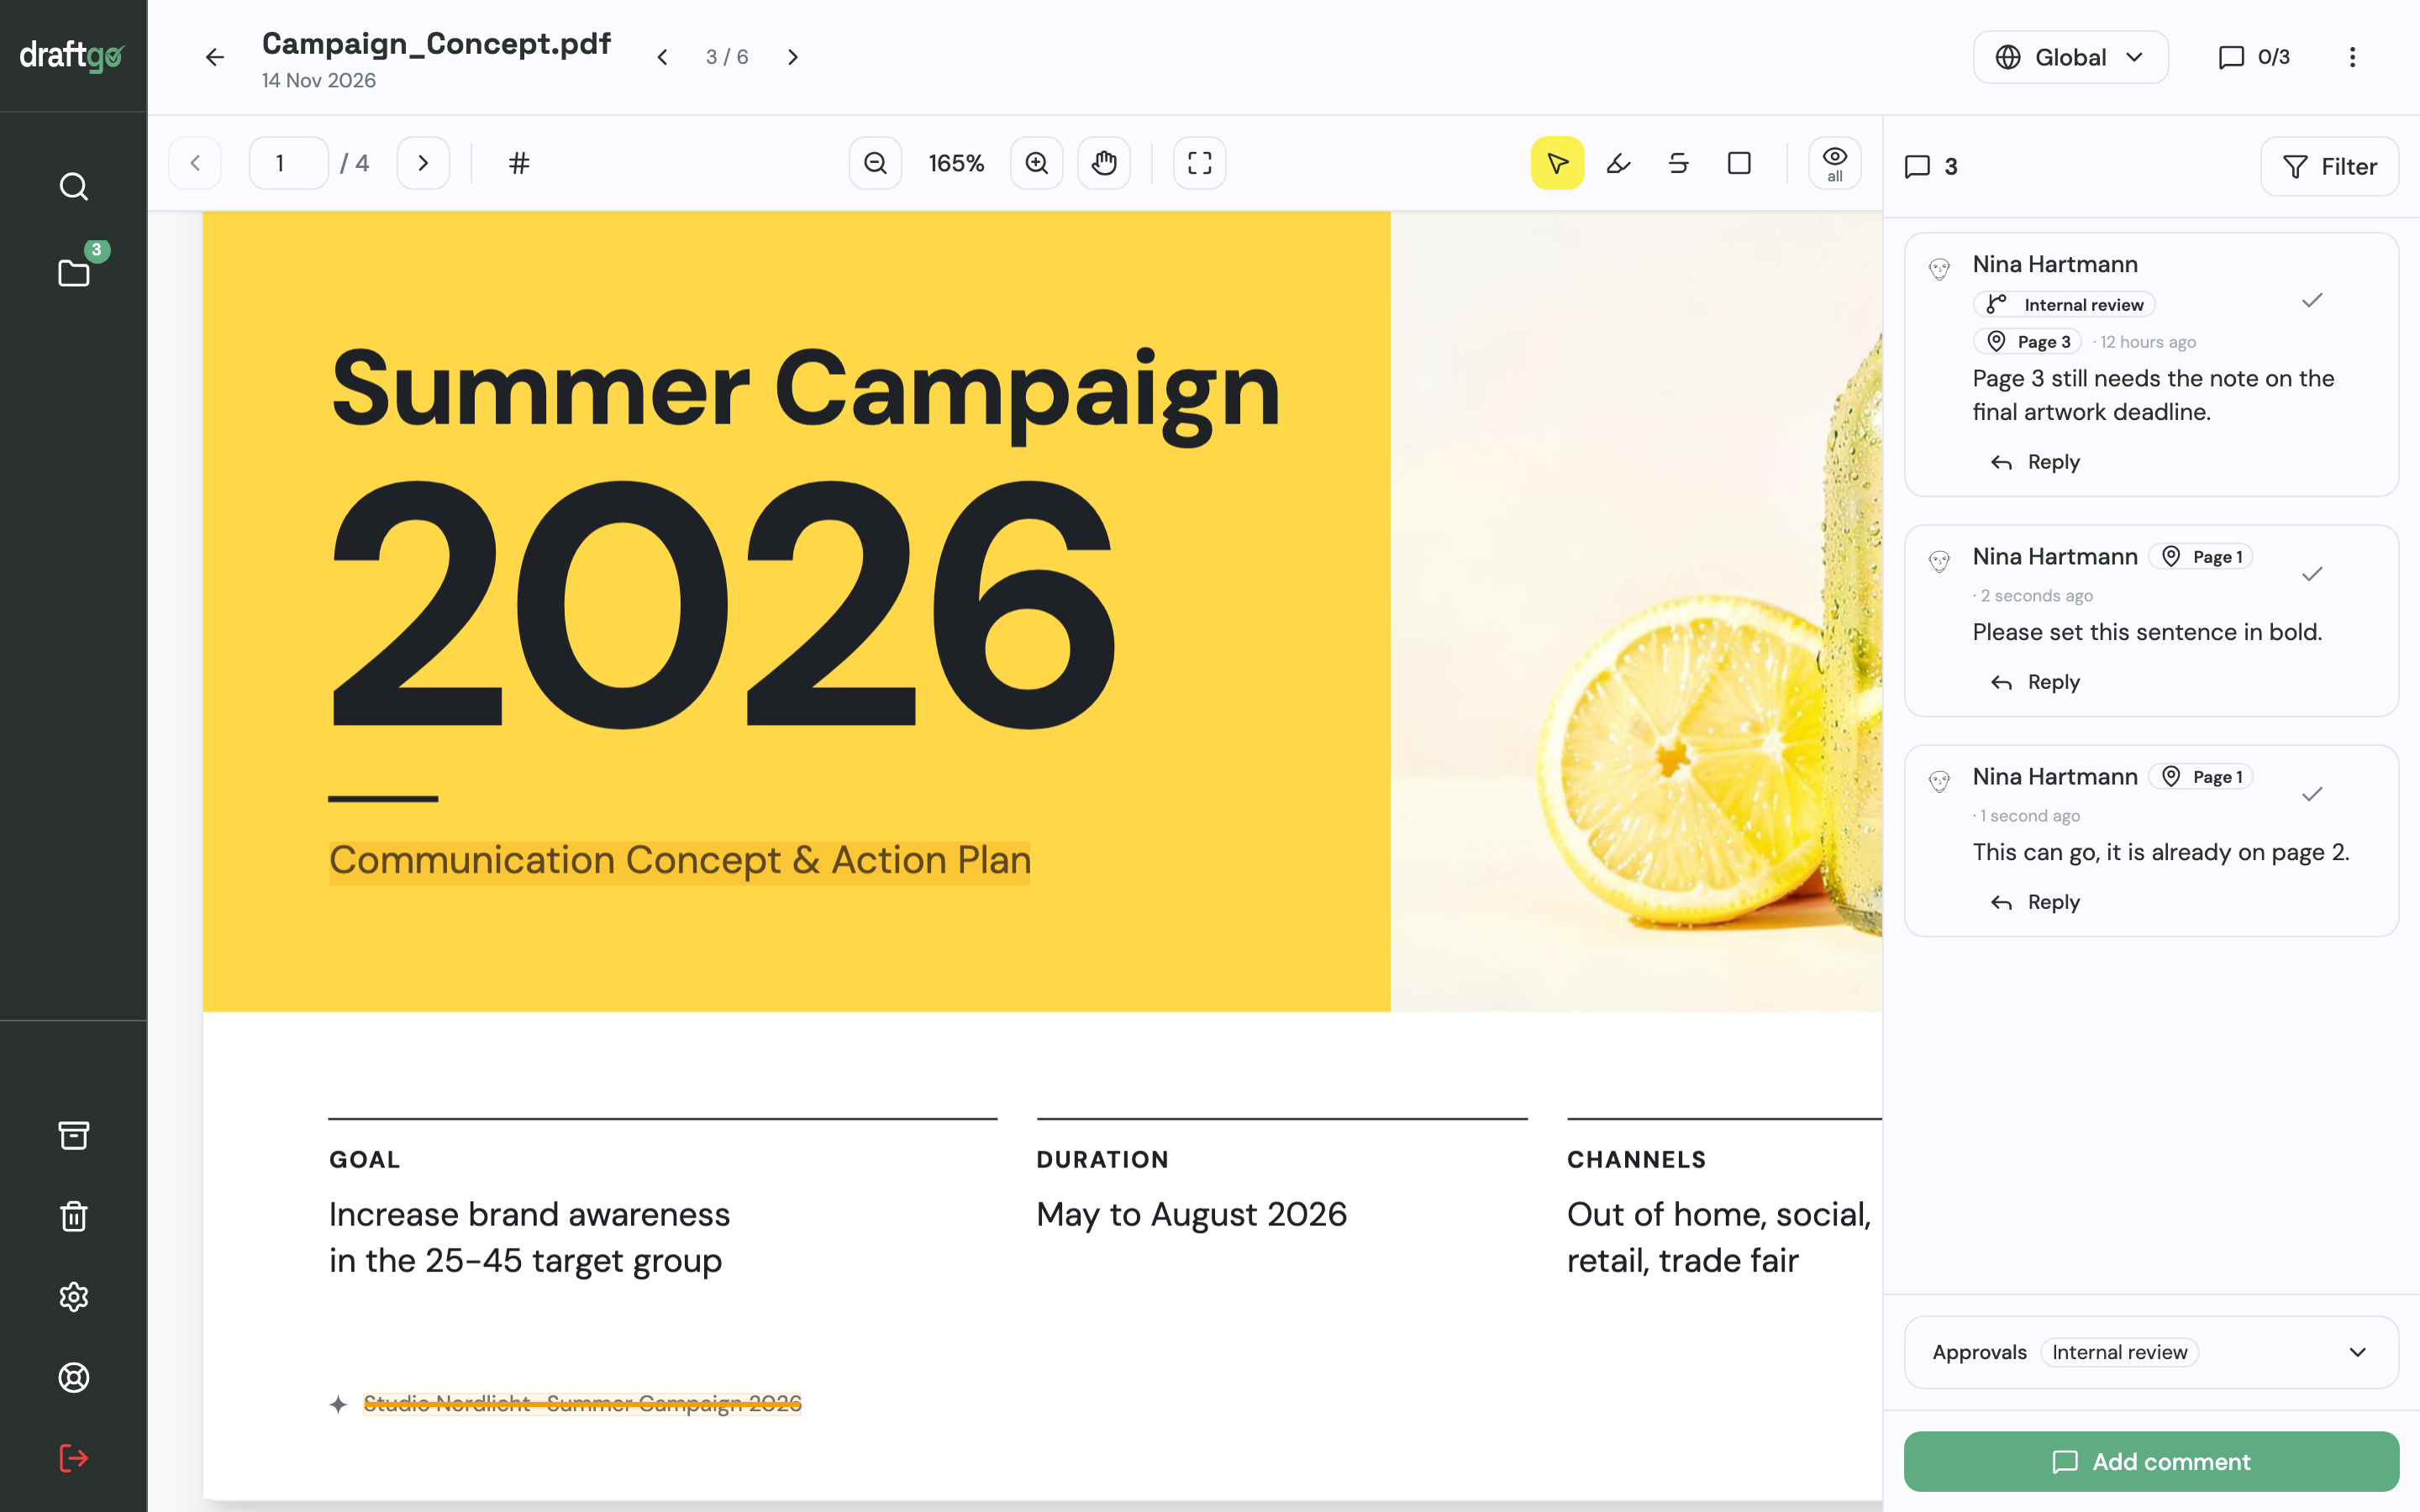
Comments sit as a point or a rectangle on the PDF page, or as a text highlight or strikethrough in the copy. Everyone sees which word, price or image is meant, and each comment carries its page number.
3. Review internally first, then with the client
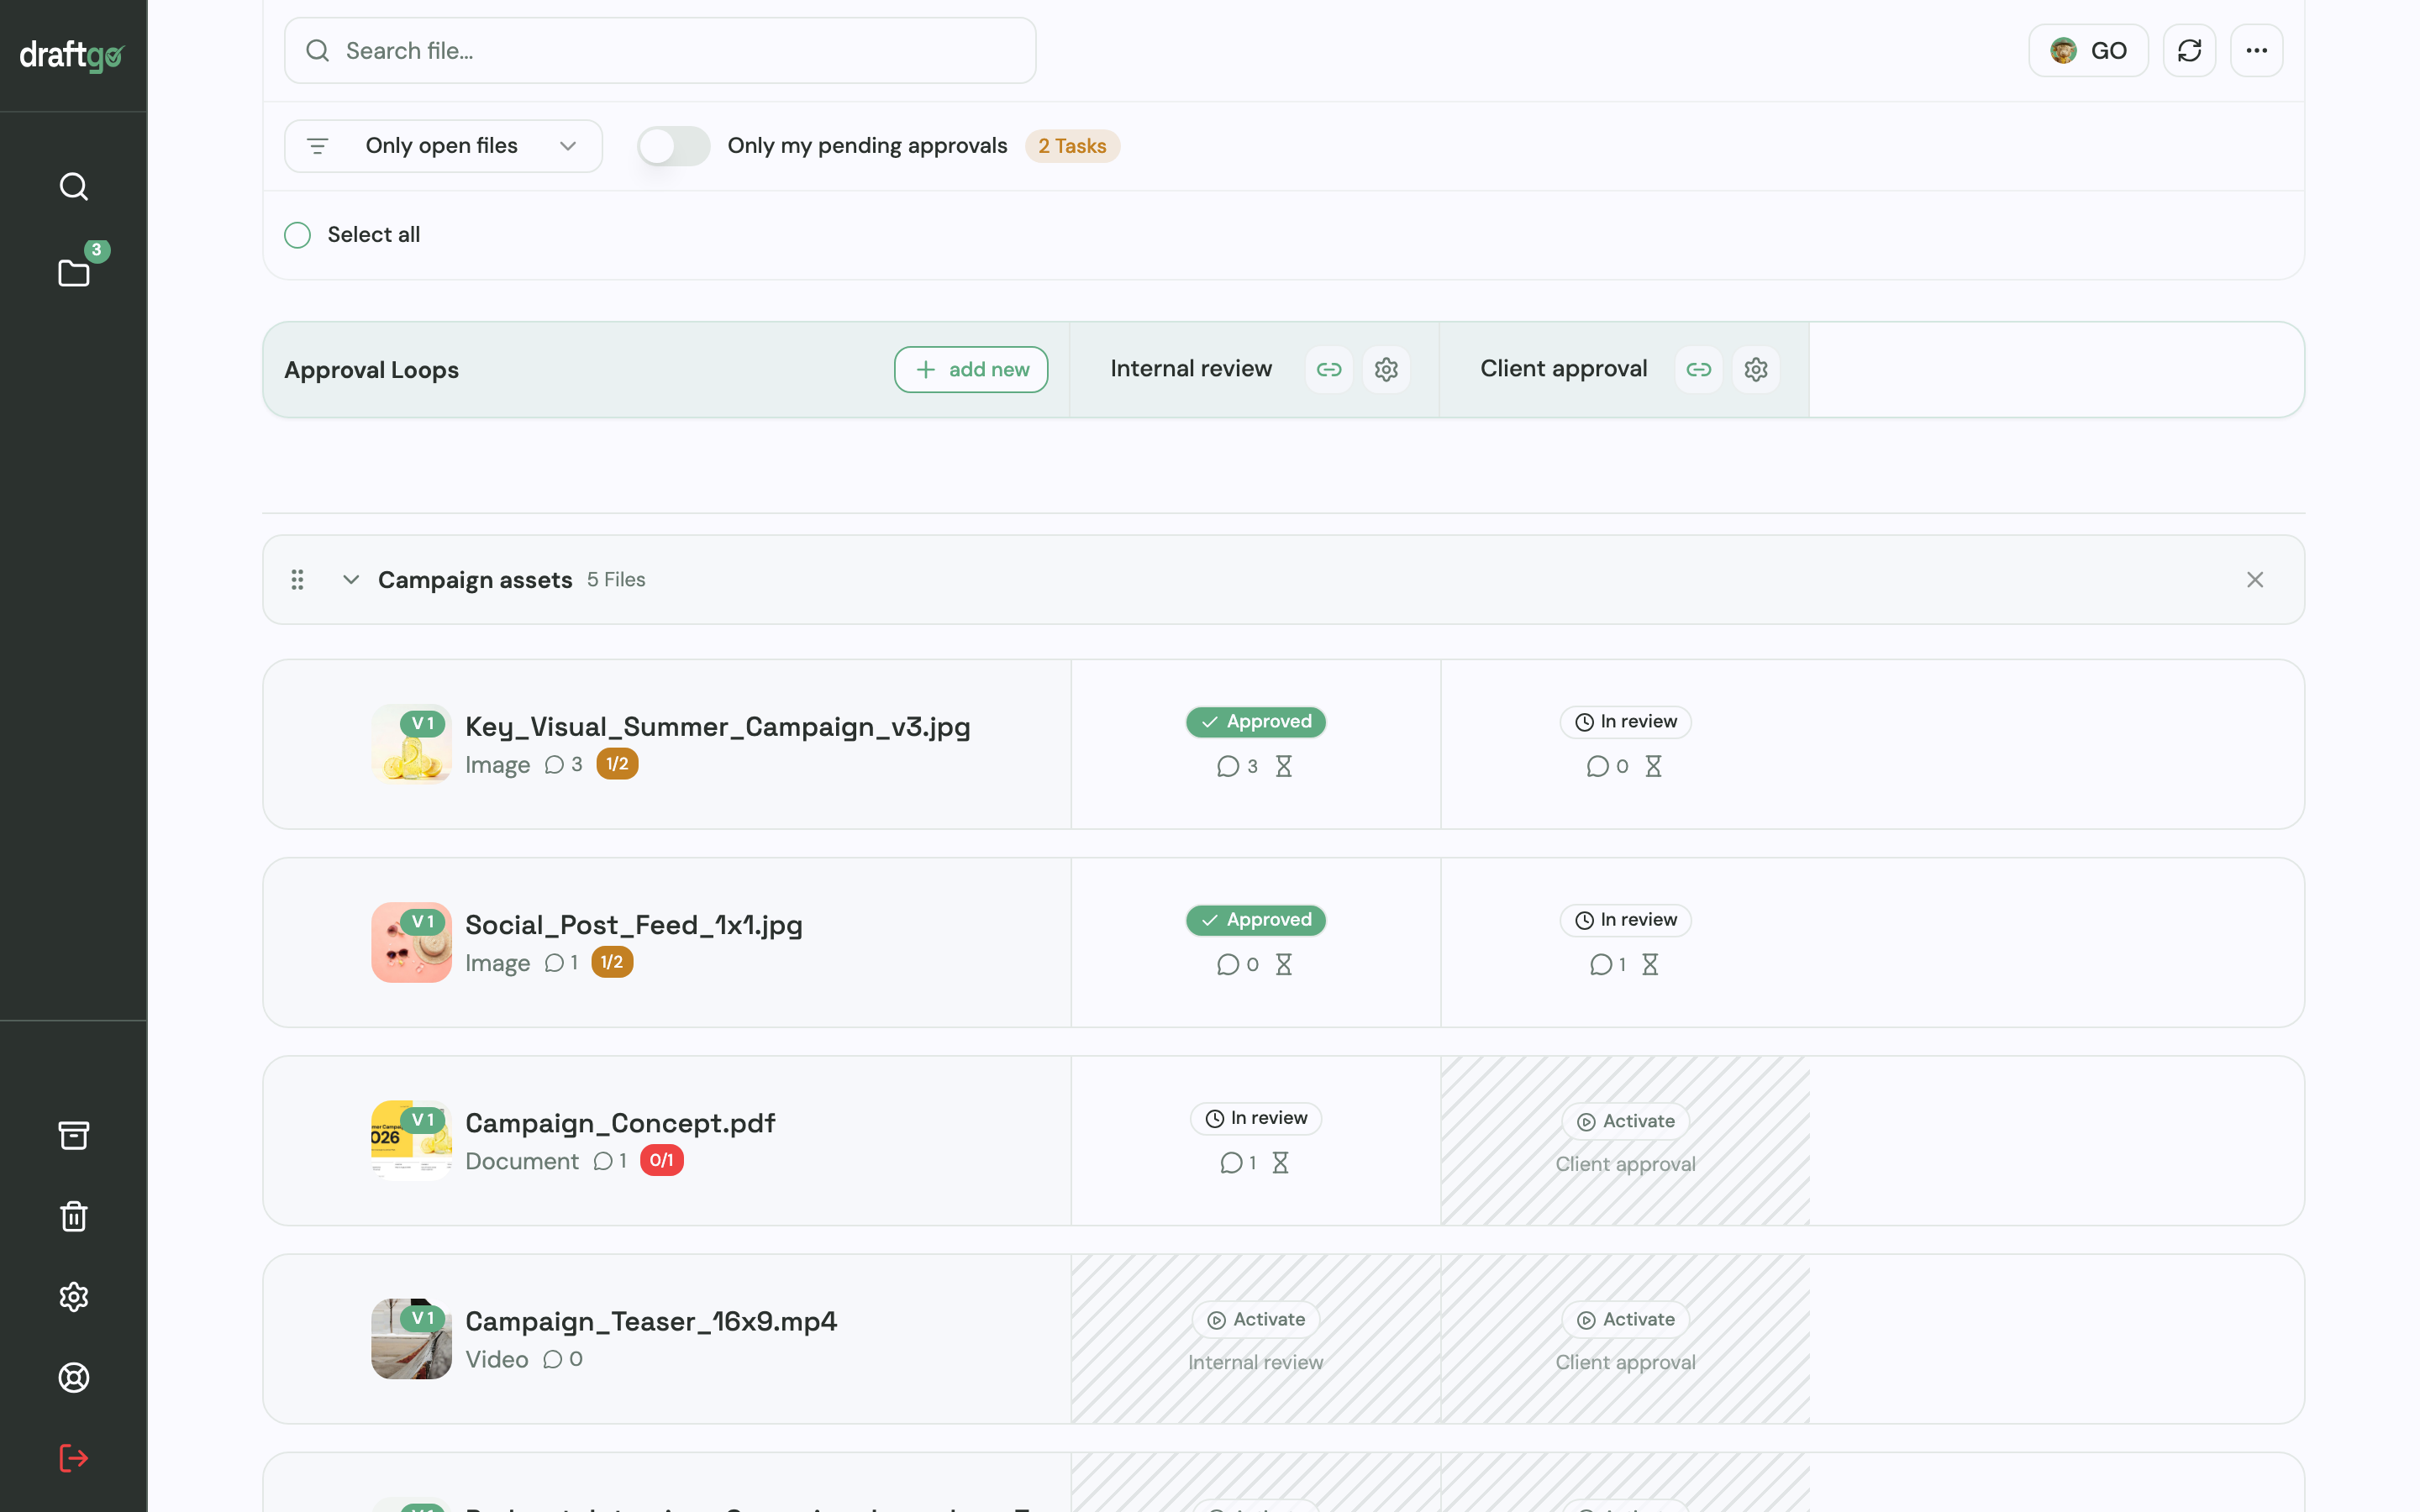
Approvals run in loops, for example an internal check of the print file first and then the client round. For each loop you decide whether everyone, a set number of people or one person has to approve, separately for your team and for guests.
4. Invite the right people
Each person on the client side who has to approve gets a personal approver link. Colleagues who only review share a viewer link: they comment but don't approve.
5. Upload corrections as a new version
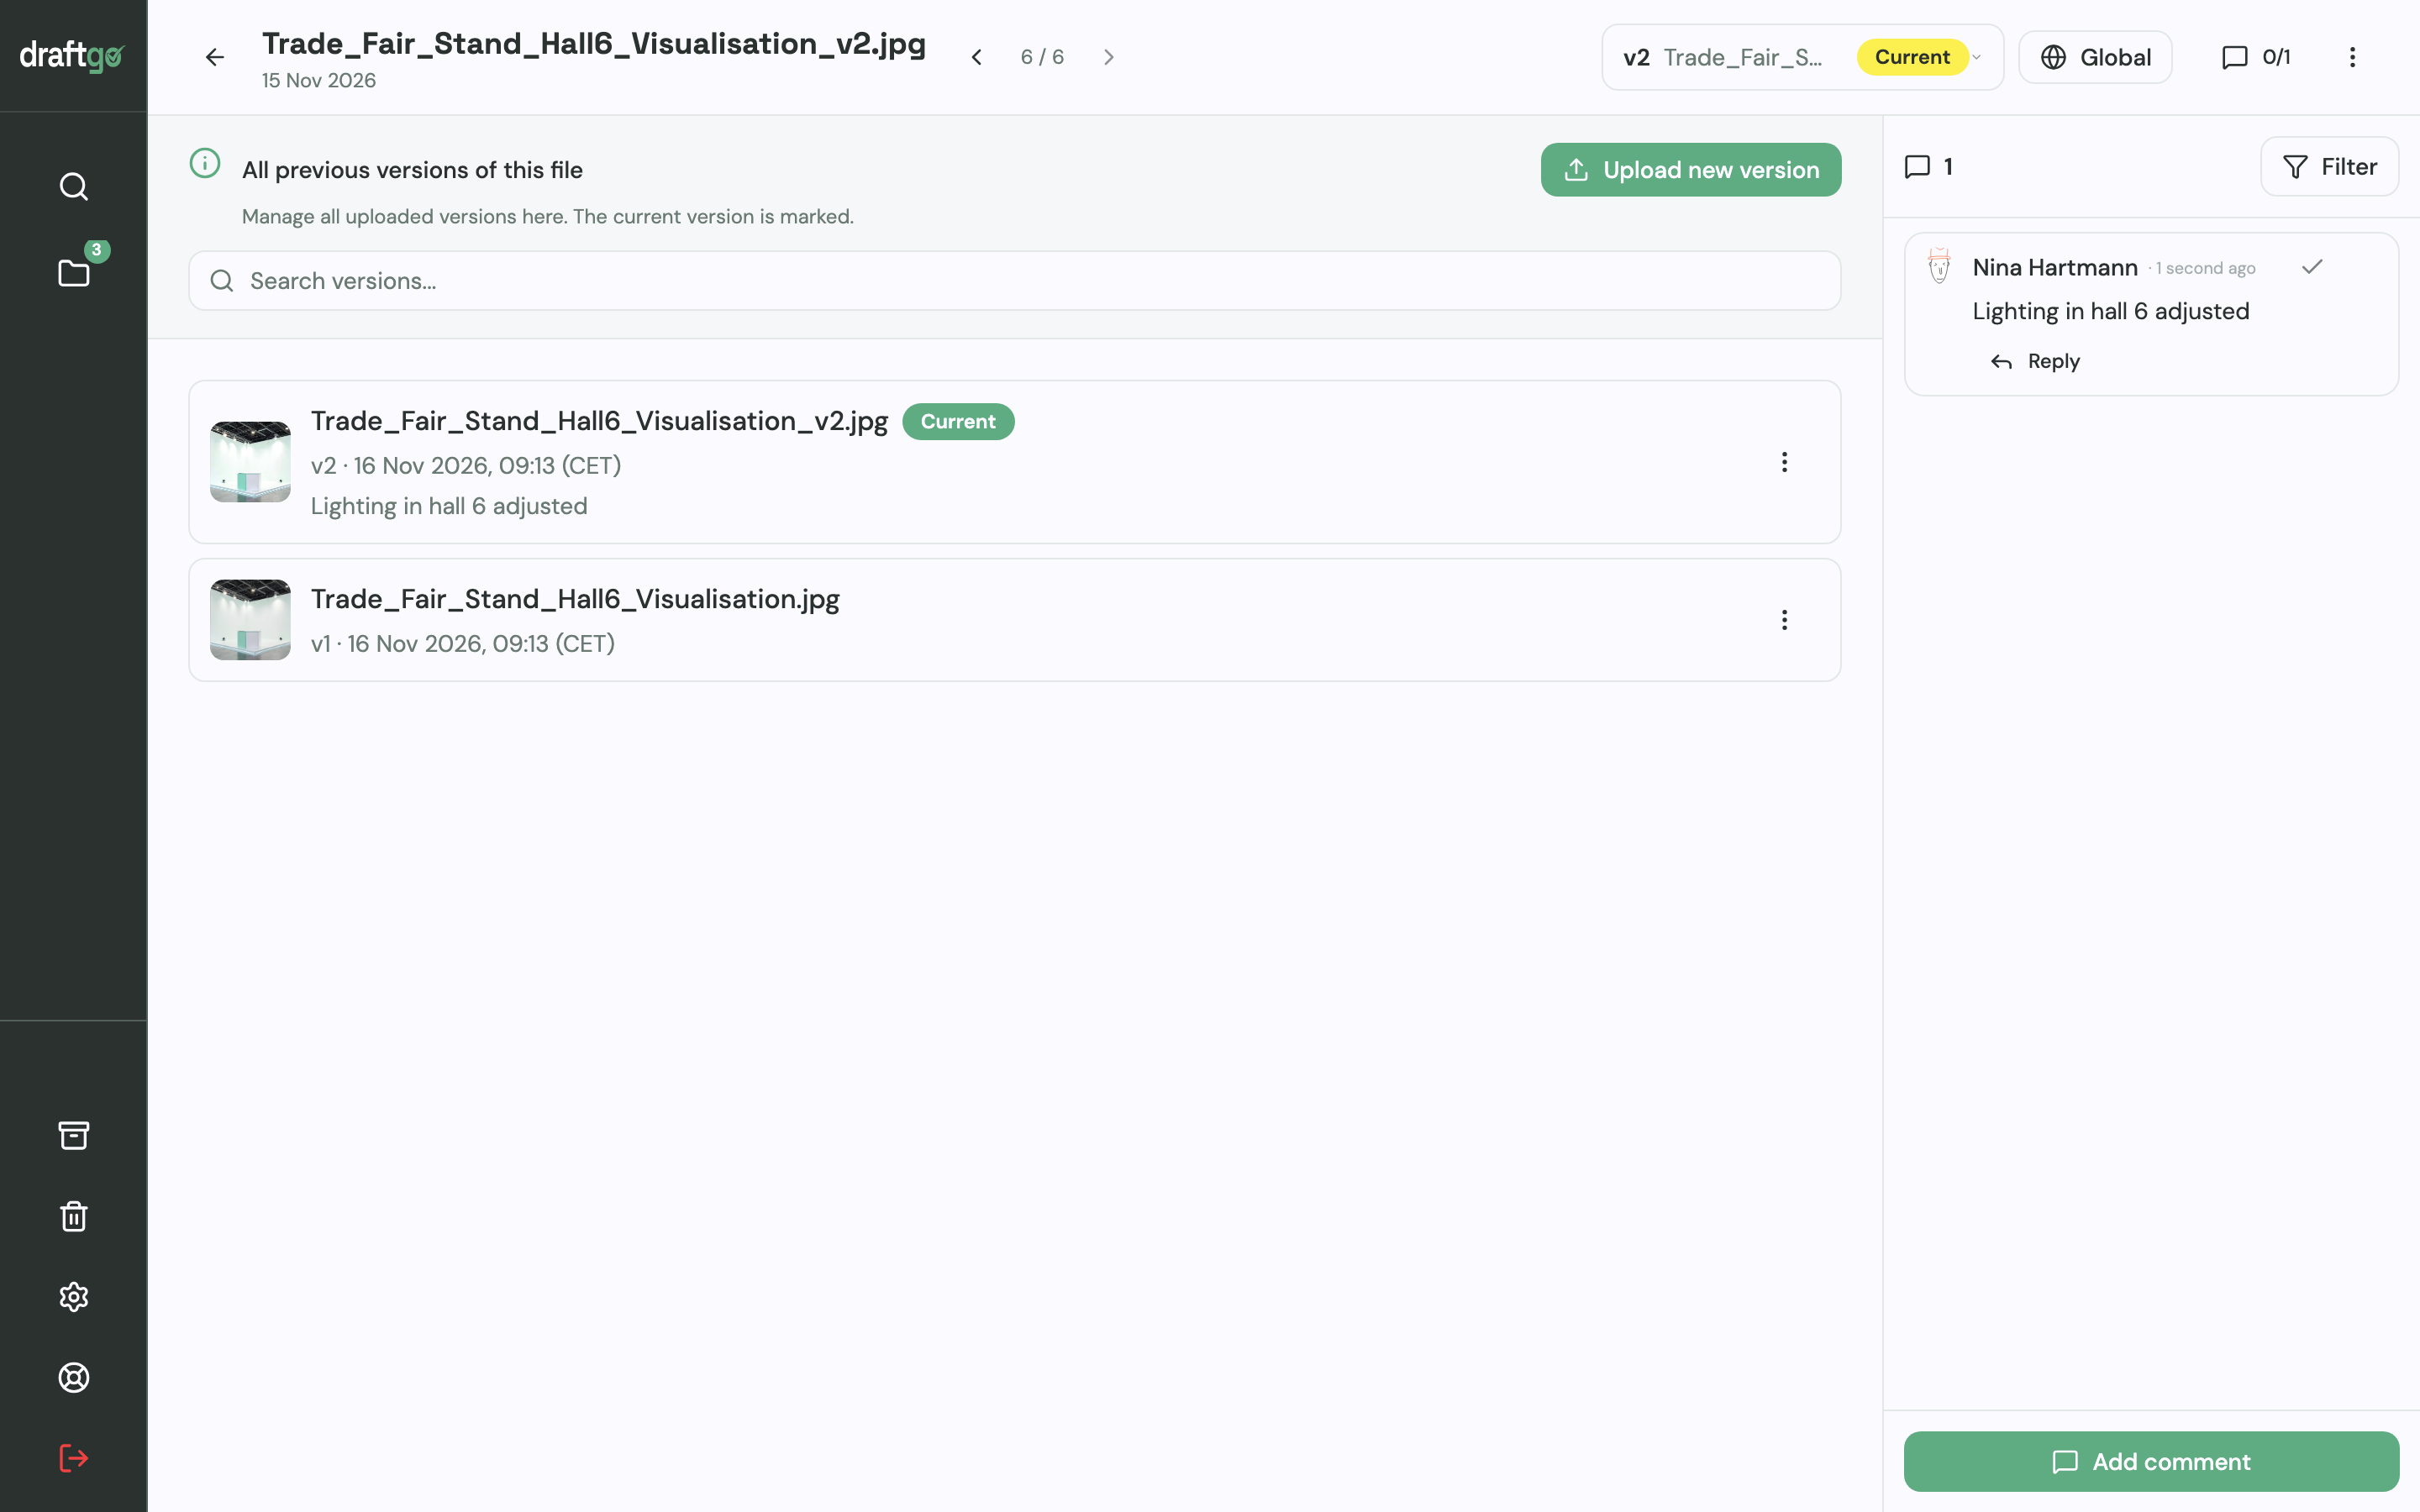
Upload the corrected file as a new version of the same file. Earlier versions stay available one by one, comments stay with their version, and approvals start again for the new version. An approval therefore always belongs to the current version, the one you send to the printer.
6. Run the AI review before the client round
Before the client sees the file, you can start the AI review: our AI agent “GO” checks PDFs and images for errors such as spelling, cut-off text or very small type, and in print PDFs it also measures image resolution. Its comments carry the name GO and sit at the affected spot. The AI review is included from the Freelancer plan with a monthly page allowance, and the pricing page has the details. The colour-accurate proof still comes from your printer.
7. Document the sign-off
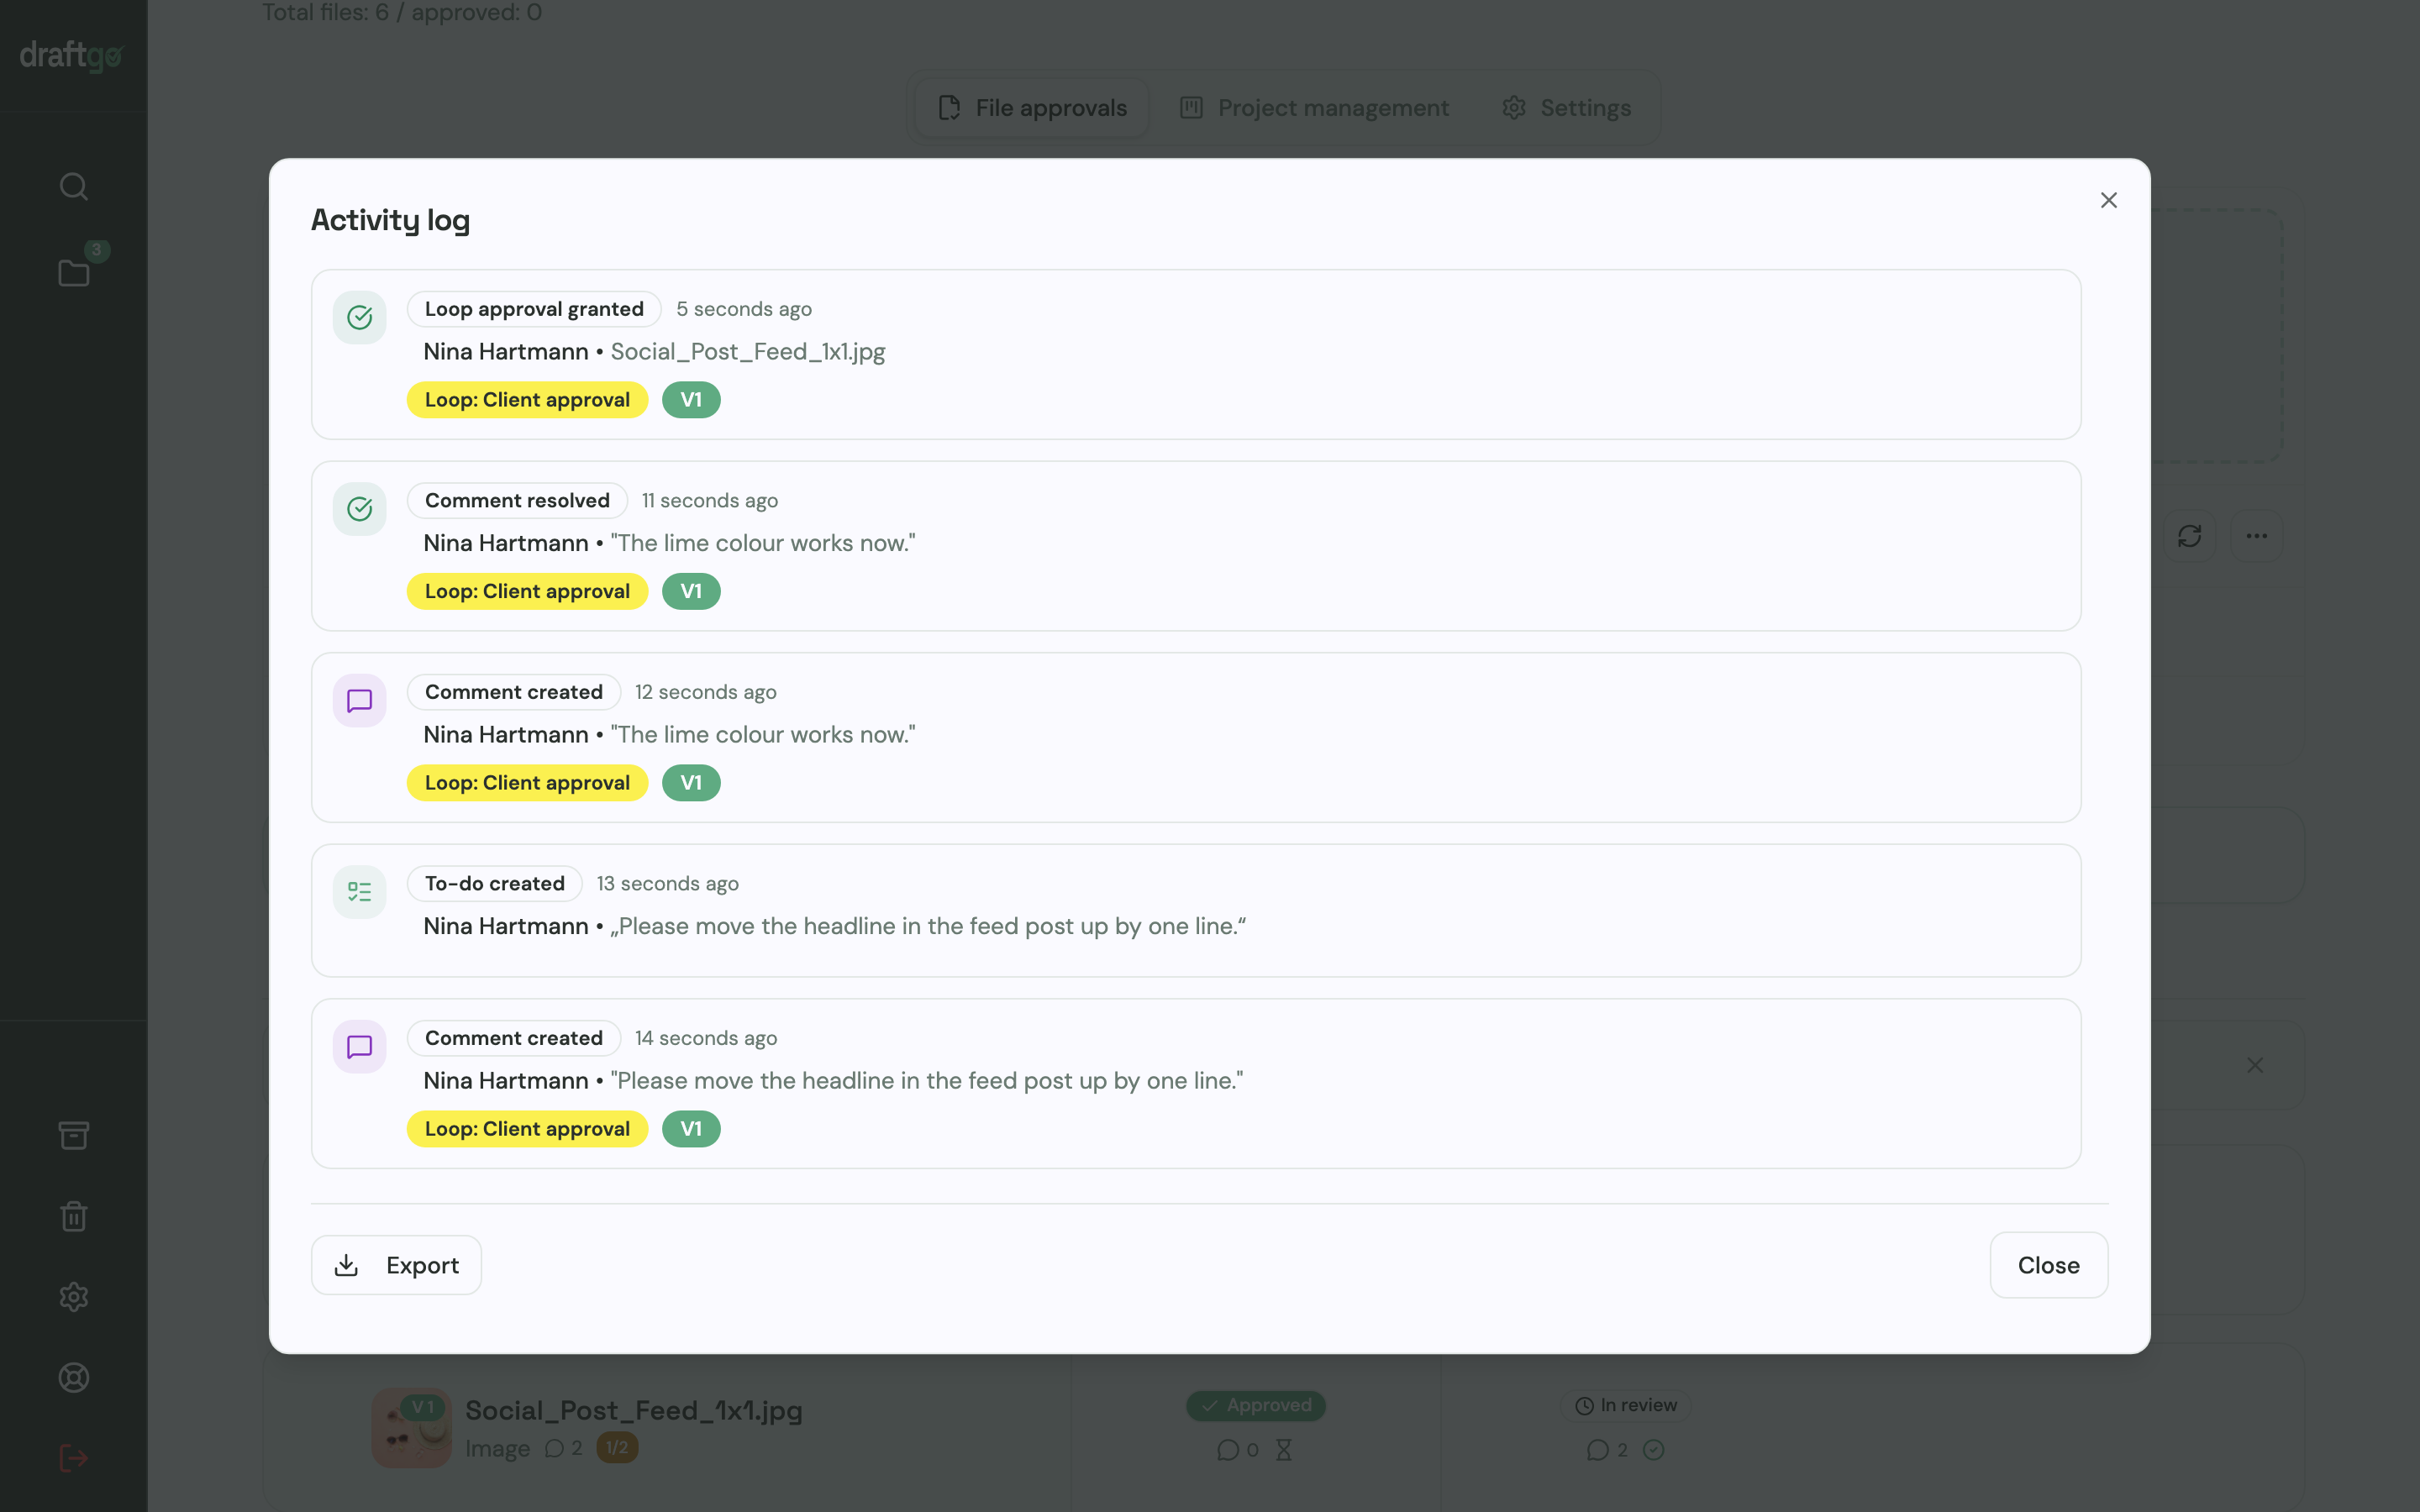
In a loop, each file is inactive, in review or approved. The activity log records approvals, comments, versions and downloads with person and time, and you can export it as CSV, JSON or PDF. For a single file there is also a review record as PDF and CSV, which you can file with your OK to print.
How agencies get flyers, posters and ads through approval is shown on the page for print and advertising approval. For reports, contracts and other documents, see PDF annotation and document review.
FAQ
What is the difference between prepress and final artwork?
Final artwork, also called artworking, is one part of prepress: it turns the approved layout into a technically clean, print-ready file. Prepress also covers preflight, colour management, imposition, proofing and the output to plate or press. Final artwork usually sits with the agency or a freelance artworker, the other steps often with the printer.
Do I need a contract proof for every print job?
No. For simple jobs on standard paper, clean files to the printer's specification and a content approval of the final file are usually enough. For brand colours, demanding images, special papers and packaging, it makes sense to order a contract proof or a press proof.
Can a client approve colours on a laptop?
Not reliably. An uncalibrated screen shows colours differently from device to device, so a laptop is fine for checking copy, images and layout but not for colour. For colour approval, use a contract proof or a soft proof on a calibrated monitor under standard light.
Which PDF standard should I export for print?
Use the standard your printer's spec sheet names. PDF/X-4 keeps transparency, layers and ICC-based colour, while PDF/X-1a suits workflows that convert everything to CMYK early, as the bvdm guideline MediaStandard Print 2018 explains. If the spec sheet says nothing, ask the printer before you export.
What does “OK to print” mean?
“OK to print”, also called a signed proof or press approval, is the explicit approval of a print file or a proof for production. Whoever gives it confirms that exactly this version may be printed. Keep a record of which version was approved, by whom and when.
Who works in prepress?
In print shops and at specialised prepress services, the work is done by prepress operators, artworkers and colour management specialists. Agencies with their own artwork studio handle part of it in-house, and many designers now do prepress tasks themselves in their layout software.
Conclusion
Prepress turns your layout into a file that gets through production safely. Many costly print errors are content mistakes that get past everyone between design sign-off and print, such as a swapped price or a wrong phone number. Have your clients approve the final print file every time, and plan a contract proof from the start when a brand colour matters.
Try it free – draftgo is free for 14 days, no credit card needed.
Written by
Emilia
Content Producer
Ready to streamline your approval processes?
Get started with draftgo today and see how easy professional collaboration can be.